


Navigation: Command Center > Admin Icon > HR and Access Control Icon > Roles.

The Manage Users screen displays the list of existing users and their corresponding roles, in a line item format. These items can be organized in an ascending or descending order by using the arrow in the Username column. The check boxes corresponding to every line item indicates whether user is active or inactive. The summary information for the user records is displayed at the bottom of this page. The navigational arrows provided at the bottom enable the users to navigate one/more records at a time.
- Click the Add button on this page to add a new user .
- Select a user and click the Edit button on this page to update the user details .
- Select a user and click the Delete button on this page to delete the user.
Right-click on any deleted record. A short cut menu with option Undo Delete comes up. Click this option to retrieve the deleted record into the system.
On right clicking on any other user, the option Set Permission appears. Click on this option to grant/revoke permission for the specific user. The Manage Permission screen comes up.
Navigation: Command Center > Admin > HR and Access Control > User > Add Button
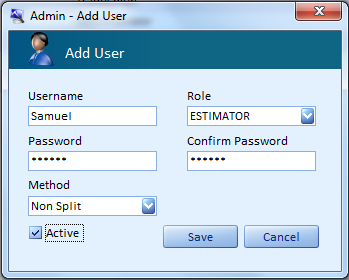
The Admin Add User screen helps you to add a new user and capture the details pertaining to this user. Follow the steps mentioned to add a new user:
Enter the username of the new user. (Mandatory)
The role drop-down displays the list of existing roles in the system (e.g., Administrator, Tradesmen, etc.). (Mandatory)
- Note: Ensure that relevant roles are created beforehand using the Manage Role function, as only the roles that are created will be available for selection in the Role drop-down. Make a new password for the user being created in the password field. (Mandatory)
- Note: The length of the password must be a minimum of six characters
Confirm the password by repeating it in the “Confirm Password” text field (Mandatory).
By default the active check box will remain selected. To de-activate the user, you can un-check the “Active” check box.
- Click the Save button to register the new user details. Once the details are saved, the system displays a confirmation message. Click OK to proceed.
- Click the Cancel button to clear the entries and close the screen, without saving the user details.
- Note: The mandatory fields in the Add User screen must be entered, failing which, the system alerts the users.
Navigation: Command Center > Admin > HR and Access Control > User > Select User > Edit Button
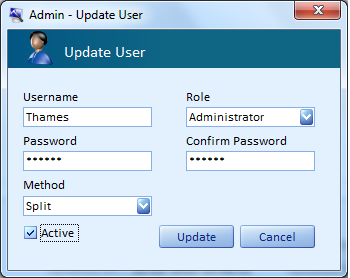
The Admin Update User screen helps you to modify the credentials of an existing user. Follow the steps mentioned to modify the user information.
Modify the new username.
The role drop-down displays the list of existing roles in the system (e.g., Administrator, Tradesmen, etc.).
- Note: Ensure that relevant roles are created beforehand using the Manage Role function, as the roles that were created will be available for selection in the Role drop-down.
Modify the password for the selected user in the password field.
- Note: The length of the password must be a minimum of six characters
Renter the password in the confirm password field if you have modified the existing password.
By default the Users are active, inorder to deactivate them, please uncheck the Active check box.
- Click the Update button to register the changes made in the user details. Once the details are updated, the system displays a confirmation message. Click OK to proceed.
- Click the Cancel button to discard the changes and close the screen.