+61 2 8004 9522 support@vqs.com.au

Menu
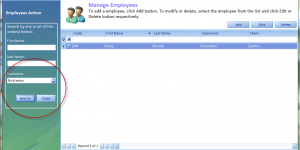
Manage Employees

The Manage Employees screen displays the list of existing employees and their corresponding information, in a line item format. The checkboxes corresponding to every line item indicates whether the user is active or inactive. The summary information for the employee records is displayed at the bottom of this page. The navigational arrows provided at the bottom enable the users to navigate one/more records at a time.

  • Click the Add button on this page to add a new employee.
  • Select a user and click the Edit button on this page to update the employee information.
  • Select a user and click the Delete button on this page to delete the employee.

hr14

The User Sessions Action section on the left pane enables you to search the records based on a search criteria. This search criteria can be based on the start and end date

  • Click the Search button on this pane to execute the search and retrieve records matching the search criterion.

hr15

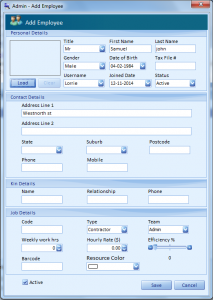
The Admin -Add Employee screen helps you to capture the details pertaining to the new employee being created under different categories.

hr16

The information captured for every employee is as follows:

Personal Details:

  • Click the Load button to upload the soft copy of the photos/ documents pertaining to the employee being added.
  • Click the Clear button to remove the uploaded files. This button will get activated only if files have been uploaded.
  • From the Title drop-down, select the title of the employee being added.
  • Enter the first name of the employee. (Mandatory)
  • Enter the last name of the employee. (Mandatory)
  • Select the gender of the employee (Male or Female) from the Gender drop-down. (Mandatory)
  • Click the drop-down arrow in the Date of Birth field. A calendar is shown from wherein; you can select the date of birth of the employee. (Mandatory)
  • Enter the tax file number in the corresponding text box.
  • The usernames created using the Add Users feature appears as options in Username drop-down . Select the username to be assigned to this employee.
  • Click the drop-down arrow in the Joined Date field. A calendar is shown from wherein; you can select the date of joining of the employee.
  • The statuses created using the Add Employee Status feature appears as options in Status drop-down . Select the status to be assigned to this employee. Some examples of statuses are Active, Terminated, Suspended, etc.

Contact Details:

  • Provide the address of the employee in the Address Line 1 and Line 2 fields.
  • The State drop-drown list displays the various states. Select the state to which the employee belongs to.
  • Select the suburb pertaining to the employee.
  • Enter the postal/zip code that corresponds to the address of the employee.
  • Provide the employees contact phone number and the mobile number.

Kin Details:

  • Enter the name of the relative who is to be contacted during emergency/absence.
  • Provide the relationship of the person with the employee.
  • Enter the relatives contact phone number.

Job Details:

Enter the employee code in the Code text field.

  • The various employee types created using the Add Employee Type feature appears as options in the Type drop-down. Select the type of the employee being added. Some examples of employee types are Full time, Part time, Contractor, Temporary, etc. (Mandatory)
  • The different employee teams created using the Add Employee Team feature appears as options in the Team drop-down. Select the team to which this employee is to be assigned. (Mandatory)
  • Enter the total work hours of the employee in a week in the Weekly Work Hours field. You can also use the up and down arrows to increase or decrease the value in this field.
  • Mention the rate per hour for the employee being added. Use the up and down arrows to increase or decrease the value in this field.
  • Use the + and – buttons beside the ruler to increase or decrease the efficiency of the employee.
  • Enter the barcode for the employee.
  • By default, the employee is active, to deactivate the employee, uncheck the Active check box.
  • Click Save to register the new employee details entered.

On clicking the Save button; the system displays a confirmation dialog box. Click OK to proceed to save the employee details.

  • Click Cancel to close the screen without saving the employee details.
  • Note: The mandatory fields in this screen must be entered failing which the system alerts the users.
  • Click the Clear button to erase the selected dates.

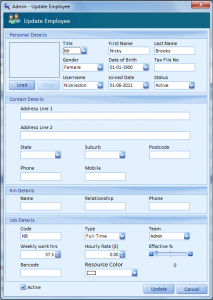
The Admin Update Employee screen helps you to modify the details pertaining to the selected employee.

hr17

 All the information pertaining to the selected user is displayed. You can make changes to the selected user.

Personal Details:

  • Click the Load button to upload the soft copy of the artifacts pertaining to the employee being added.
  • Click the Clear button to remove the uploaded files. This button will get activated only if files have been uploaded.
  • From the Title drop-down, select a different title for the employee,
  • Modify the first name and the last name of the employee.
  • Select the gender of the employee (Male or Female) from the Gender drop-down.
  • Click the drop-down arrow in the Date of Birth field. A calendar is shown using which you can change the date of birth of the employee.
  • Modify the tax file number.
  • The usernames created using the Add Users feature appears as options in Username drop-down. Select a different username to be assigned to this employee.
  • Click the drop-down arrow in the Joined Date field. A calendar is shown using which you can modify the date of joining of the employee.
  • The statuses created using the Add Employee Status feature appears as options in Status drop-down. Select a different status to be assigned to this employee. Some examples of statuses are Active, Terminated, Suspended, etc.

Contact Details:

  • Modify the address of the employee in the Address Line 1 and Line 2 fields.
  • The State dropdrown displays the various states. Select a different state
  • Select the suburb pertaining to the employee.
  • Enter the postal/zip code that corresponds to the address of the employee.
  • Modify the employees contact phone number and the mobile