+61 2 8004 9522 support@vqs.com.au

Menu
Manage Employees Leave

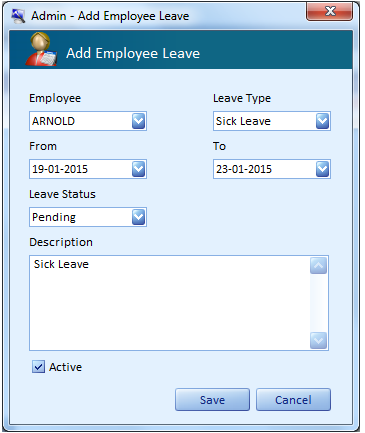
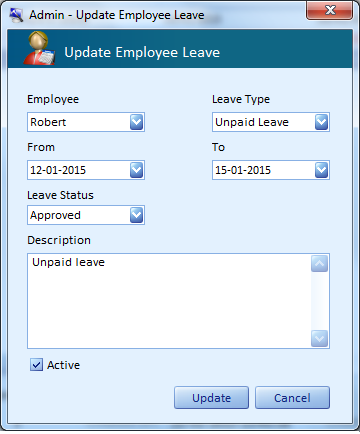
The Manage Employee Leave screen displays the list of leave actions pertaining to employees. Type column. The Employee, Leave Type, from date, to date, Status are the columns to be filled. Some examples of Leave Type are Approved, Pending, and Cancelled.

hr30

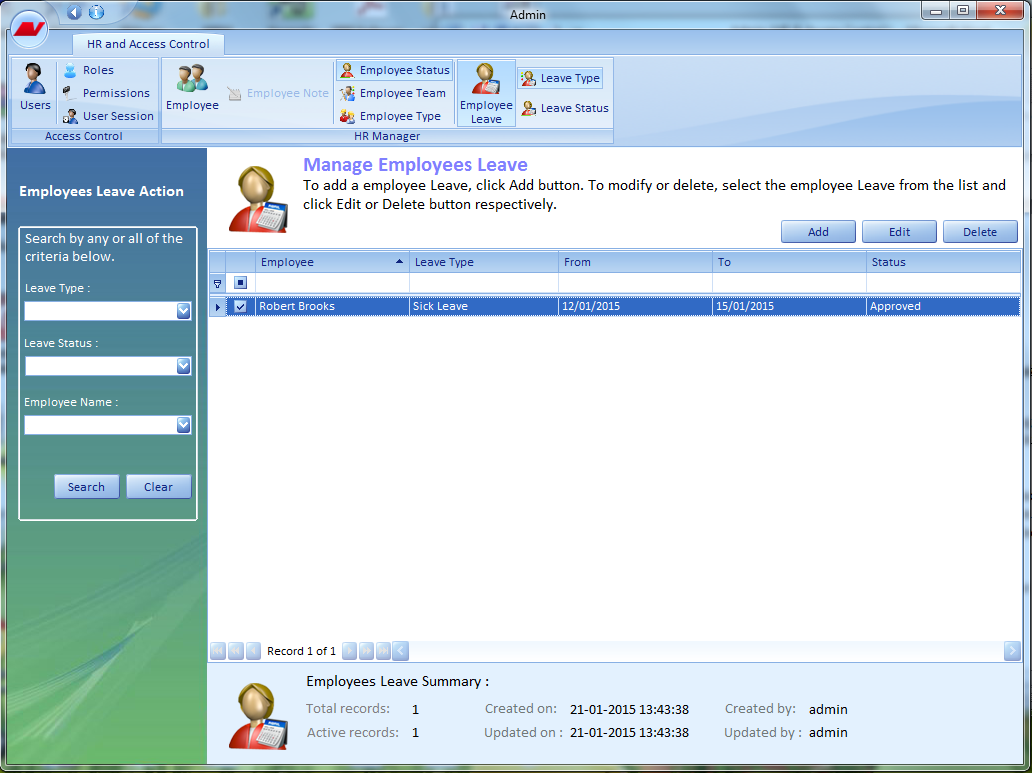
The leave status include paid, unpaid and sick leave. The check boxes corresponding to every line item indicates whether the status is active or inactive. The summary information for the Type records is displayed at the bottom of this page. The navigational arrows provided at the bottom enable the users to navigate one/more records at a time.

The Employee Leave Action section on the left pane enables you to search the records based on a search criteria. This search criteria can be based on the start and end date

hr31

  • Click the Search button on this pane to execute the search and retrieve records matching the search criterion.
  • Click the Add button on this page to add a new leave.
  • Select a leave type and click the Edit button on this page to update the leave information.
  • Select a leave and click the Delete button on this page to delete the employee leave.

Right-click on any deleted record. A short cut menu with option Undo Delete comes up. Click this option to retrieve the deleted record into the system.

The Admin Add Employee Leave screen helps you to capture the details pertaining to the new employee leave being created. The leave information can be later modified.

hr32

Follow the steps mentioned to add a new leave for employees.

  • Enter the employee name in the Employee Name text box. (Mandatory)
  • Enter the Leave Type in the appropriate box.
  • Fill the From, To dates in the appropriate boxes
  • Select the leave status.
  • Provide an appropriate description for the new leave being created in the Description text area.
  • By default the Active check box will remain selected. You can clear the check box to inactivate the new type either temporarily or permanently.
  • Click the Save button to register the new leave. Once the details are saved, the system displays a confirmation message. Click OK to proceed.
  • Click the Cancel button to close the screen, without saving the leave details.
  • Note: The mandatory fields in this screen must be entered failing which the system alerts the users.

The Admin Update Employee Leave screen helps you to modify an existing employee leave information on need basis.

hr33

Follow the steps mentioned to modify the employee leave information.

  • Edit the Employee Leave field if required.
  • Edit the From, To dates in the appropriate boxes
  • Edit the leave status.
  • Edit the Description field if required.
  • By default the Active check box will remain selected. You can clear the check box to inactivate the selected leave either temporarily or permanently.
  • Click the Update button to register the changes made in the leave details. Once the details are saved, the system displays a confirmation message. Click OK to proceed.
  • Click the Cancel button to discard the changes and close the screen.